
Mark had one job — to update his company’s WordPress site.
He clicked “Update Now,” walked out to grab a coffee, and returned to a site that didn’t load.
Panic set in. The homepage was a mess. Customer logins failed. And the support team was drowning in emails with subject lines like “URGENT!!” and “What did you do??”

Well, Mark unknowingly broke the website.
But with this guide, you won’t. Here’s how to update your WordPress site safely — without turning your day into an absolute disaster.
Why Update Your WordPress?
Keeping WordPress up to date is critical for your site’s security, performance, and functionality.
- Security: Every update patches vulnerabilities that hackers exploit. Running an outdated version is like leaving your shop’s front door unlocked overnight. If a security flaw is discovered, attackers can use it to inject malware, steal customer data, or take down your site entirely.
- Performance: Each new version optimizes code, reduces load times, and enhances efficiency. A faster site means happier visitors, lower bounce rates, and even a boost in search rankings — Google favors well-performing sites.
- Functionality: WordPress updates introduce new features, improve the block editor, and enhance customization options. Staying current ensures you’re getting the best tools to run your business efficiently.
- Compatibility: If your core software is outdated, some plugins may stop working or cause conflicts. Keeping everything updated prevents breakdowns and keeps your site running smoothly.
Why Not Just Hit the “Update Now” Button?
You could do that, and more often than not, the update will turn out just fine. But if you have a lot of plugins and theme customizations on your websites, you have a higher chance of breaking your site with an update.
The most common issue is downtime. If an update crashes your site, even a few hours of outage can mean lost revenue, missed bookings, and frustrated customers. The impact is even worse for e-commerce stores or service-based businesses that rely on online leads.
When you have many plugins, the update could affect more elements. For instance, an update might make several major changes (like the WordPress 6.0 update, which included over 1,000 fixes) that may cause older plugins or themes to malfunction. Some vital site features—like checkout pages or contact forms—could suddenly stop working.
Many small businesses tweak their themes and plugins to suit their needs, but some theme updates can overwrite your customizations if they weren’t done using a child theme.
For those without technical expertise, there’s the fear of not knowing how to fix things if something goes wrong. If an update locks you out of your website or causes errors you can’t resolve, you might need to hire an expert — an unexpected cost and delay.
These risks are real, but they can be avoided with the right update strategy. Here are a few precautionary steps to follow.
Steps To Update WordPress Safely
The success of an update isn’t determined when you click the update button, but by the preparation you do beforehand.
Here’s the process that consistently works across different types of WordPress sites:
1. Review Update Release Notes
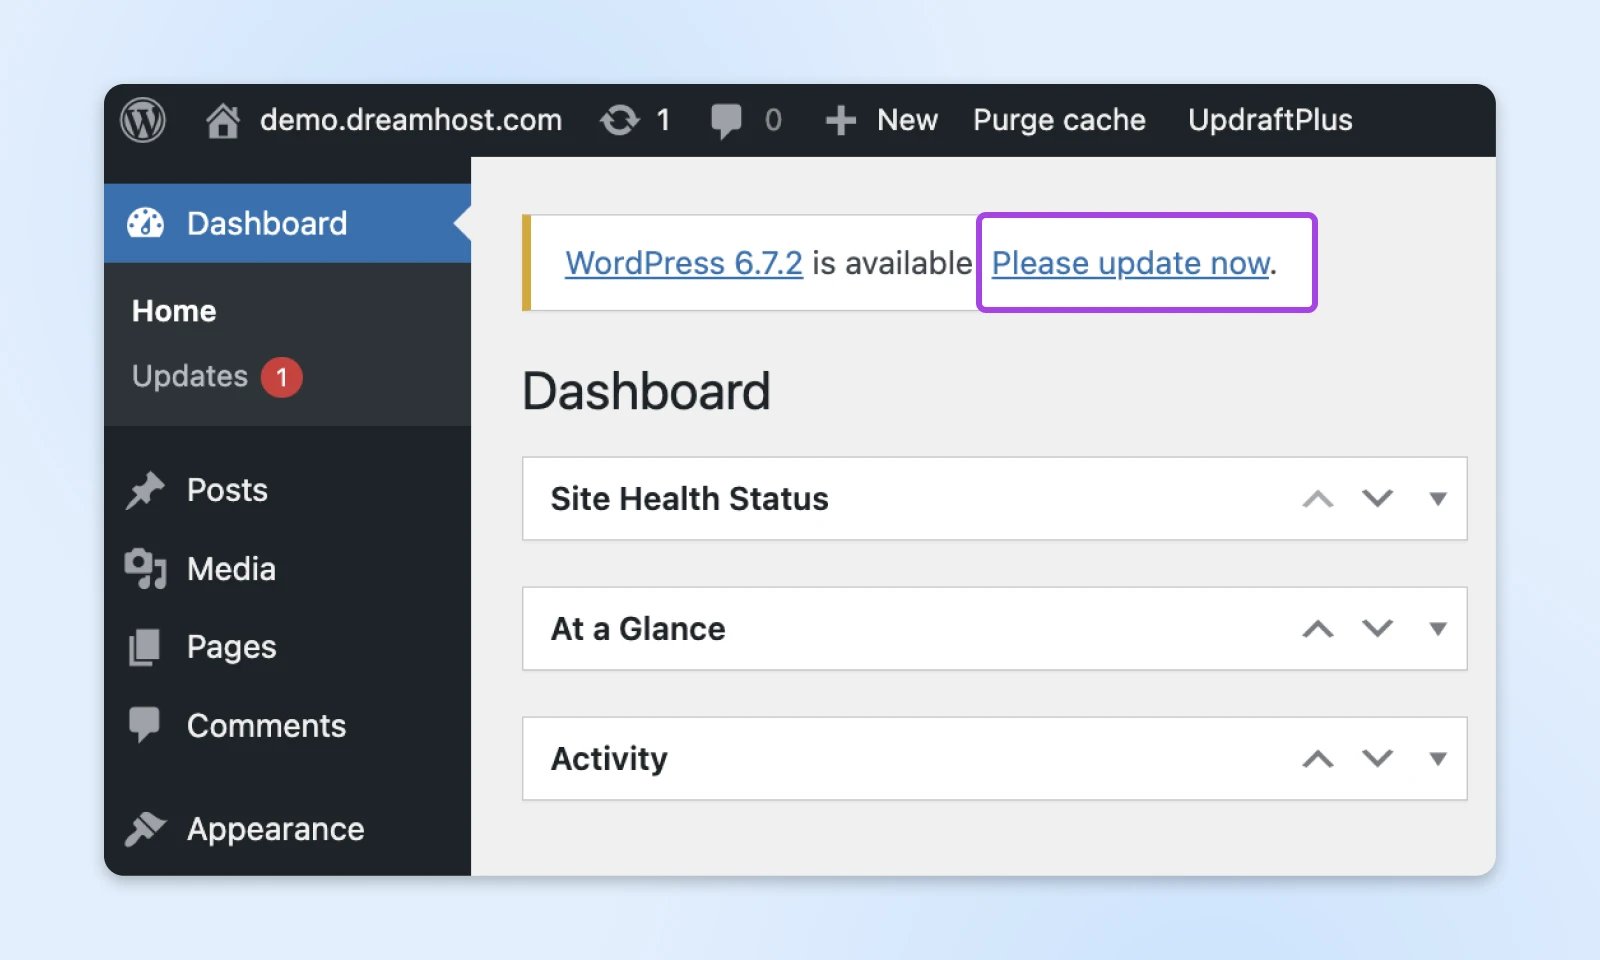
Never update mindlessly. When you see an update message on your dashboard, the first thing you should do is to read the changelogs for WordPress 6.7 core, plugins, and themes.
Developers highlight bug fixes, security patches, and compatibility changes. If an update introduces breaking changes, you can prepare accordingly or delay updates until patches are released. This will also help you learn WordPress and understand the inner workings and functions you may previously be unaware of.
2. Create a Full Backup
Every update carries some level of risk. If something breaks, a backup lets you restore your site instantly. Since it’s usually the plugins and themes that cause conflict with the update, a full backup helps you restore your site instantly in case something goes wrong.
You should have:
- A Database Backup: Your content, users, and settings; and
- A File Backup: Themes, plugins, media files, and configurations.
The easiest way to do that is to use a reliable backup plugin like UpdraftPlus.
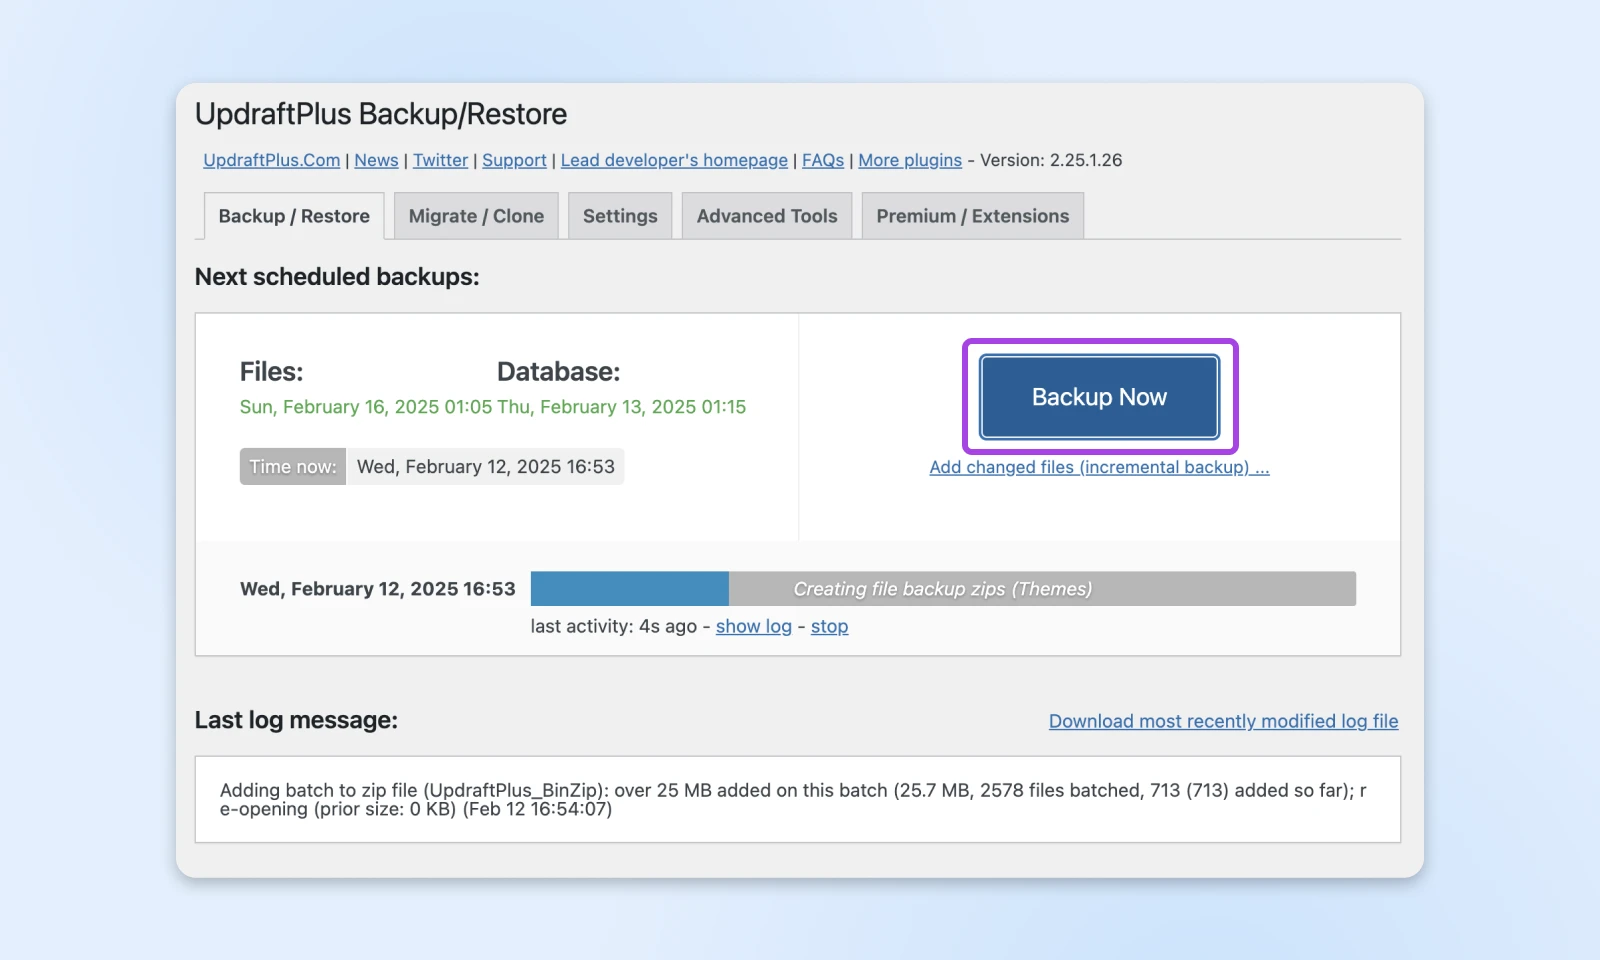
It also lets you back up automatically before any update to the website so you can be rest assured that it’s all good.
Once installed, set it up to store backups in a secure location like Google Drive, Dropbox, or an external server.
To be absolutely certain that the backup worked, verify by downloading and inspecting the files from the backup zip file.
3. Set Up a Staging Site
Even with a backup, we don’t recommend updating on your live website.
A staging environment is a clone of your live site, allowing you to test updates before applying them. If your hosting provider doesn’t offer one, use WP Staging or create a separate subdomain for testing.

How do you create a staging site?
- If your web host offers staging (e.g., DreamHost), you just need to enable it from your dashboard.
- If not, use WP Staging or clone your site to a subdomain manually.
- Import your latest backup to the staging site.
Once you’re in the staging environment, update WordPress core, plugins, and themes, then thoroughly test site functionality. Look for broken layouts, missing content, and errors in the browser console. If anything breaks, you can troubleshoot it here without impacting your live website.
After you’ve tested everything and it all seems to work fine, you can safely move to updating your live website.
4. Disable Caching and Security Plugins
Caching and security plugins can interfere with updates. Some block update requests, leading to partial installations. While others cache outdated files, preventing changes from appearing immediately.
Some security plugins can also block update processes, leading to incomplete installations.
Temporarily disable caching mechanisms like WP Rocket or W3 Total Cache, and pause security firewalls such as Wordfence to prevent false positives.
To disable caching:
- If you’re using WP Rocket, go to Settings > WP Rocket and disable caching.
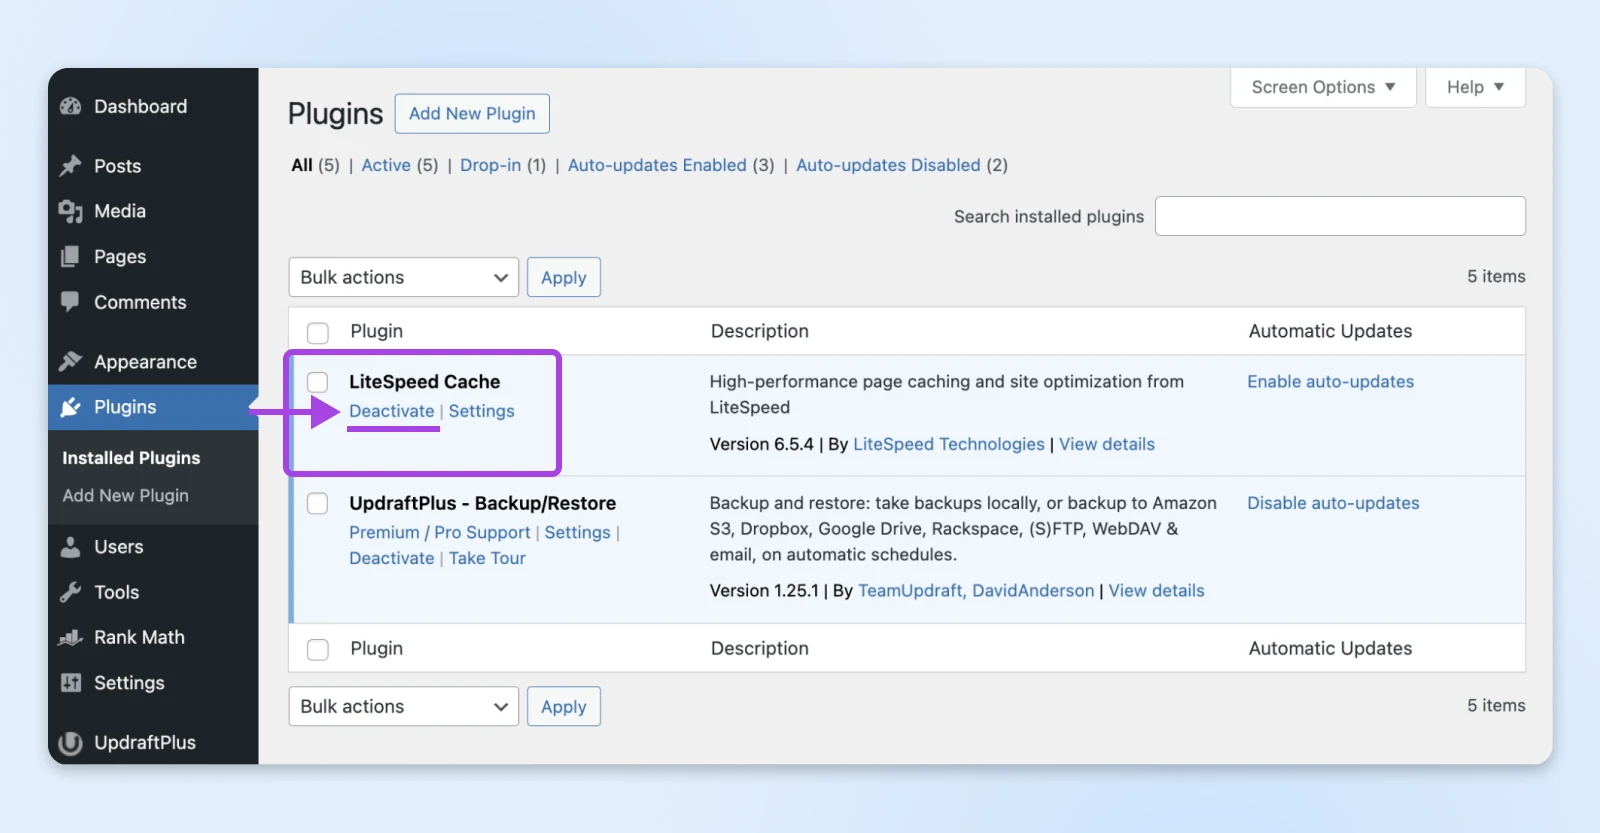
- For Litespeed Cache, navigate to Plugins > Deactivate to deactivate caching temporarily.
You also want to deactivate security plugins to avoid breaking an update:
Deactivate firewall plugins like Wordfence or Sucuri under their respective settings.
Once the updates are complete, you can re-enable them one by one while making sure that one of these plugins isn’t causing a conflict.
Now you’re ready to run the WordPress core update safely!
5. Update Plugins
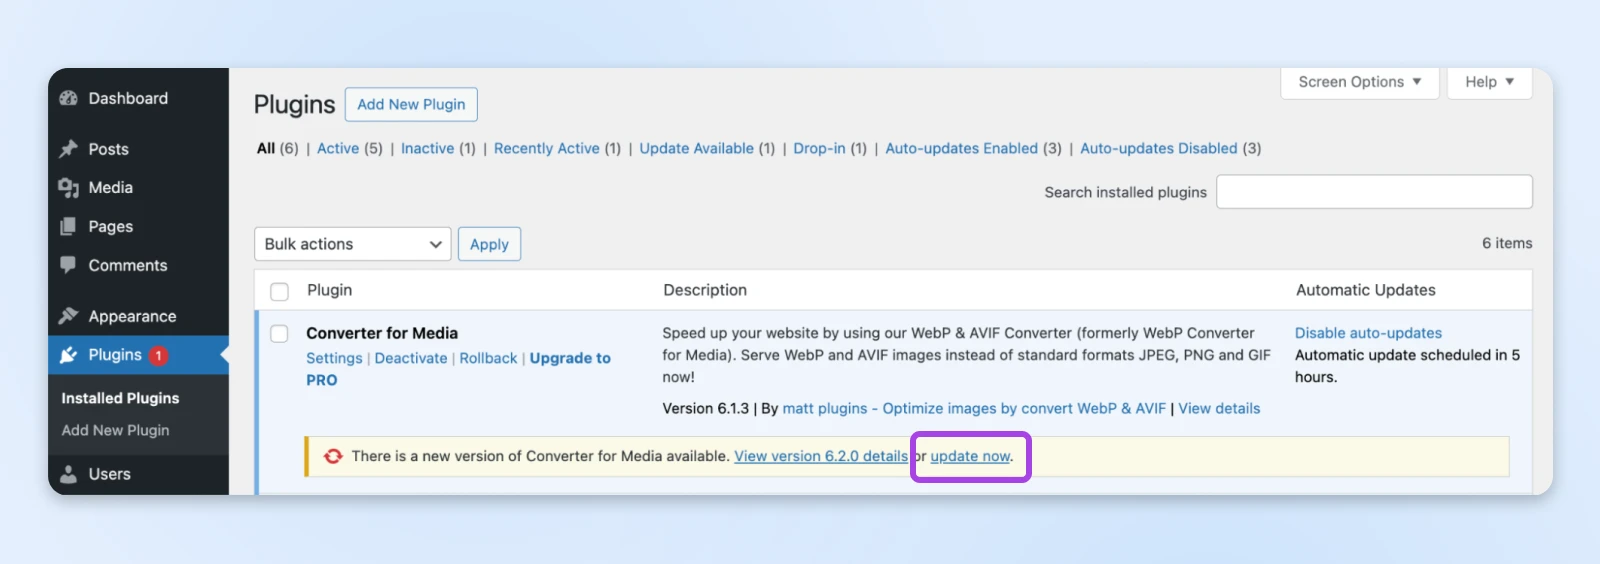
Go to Dashboard > Updates and check which plugins have available updates.
You should see a yellow bar below any plugin that has an update available. Click on the update now button to proceed with the update.
You can also run a bulk update by checking the boxes on the left for the plugins you want to update.
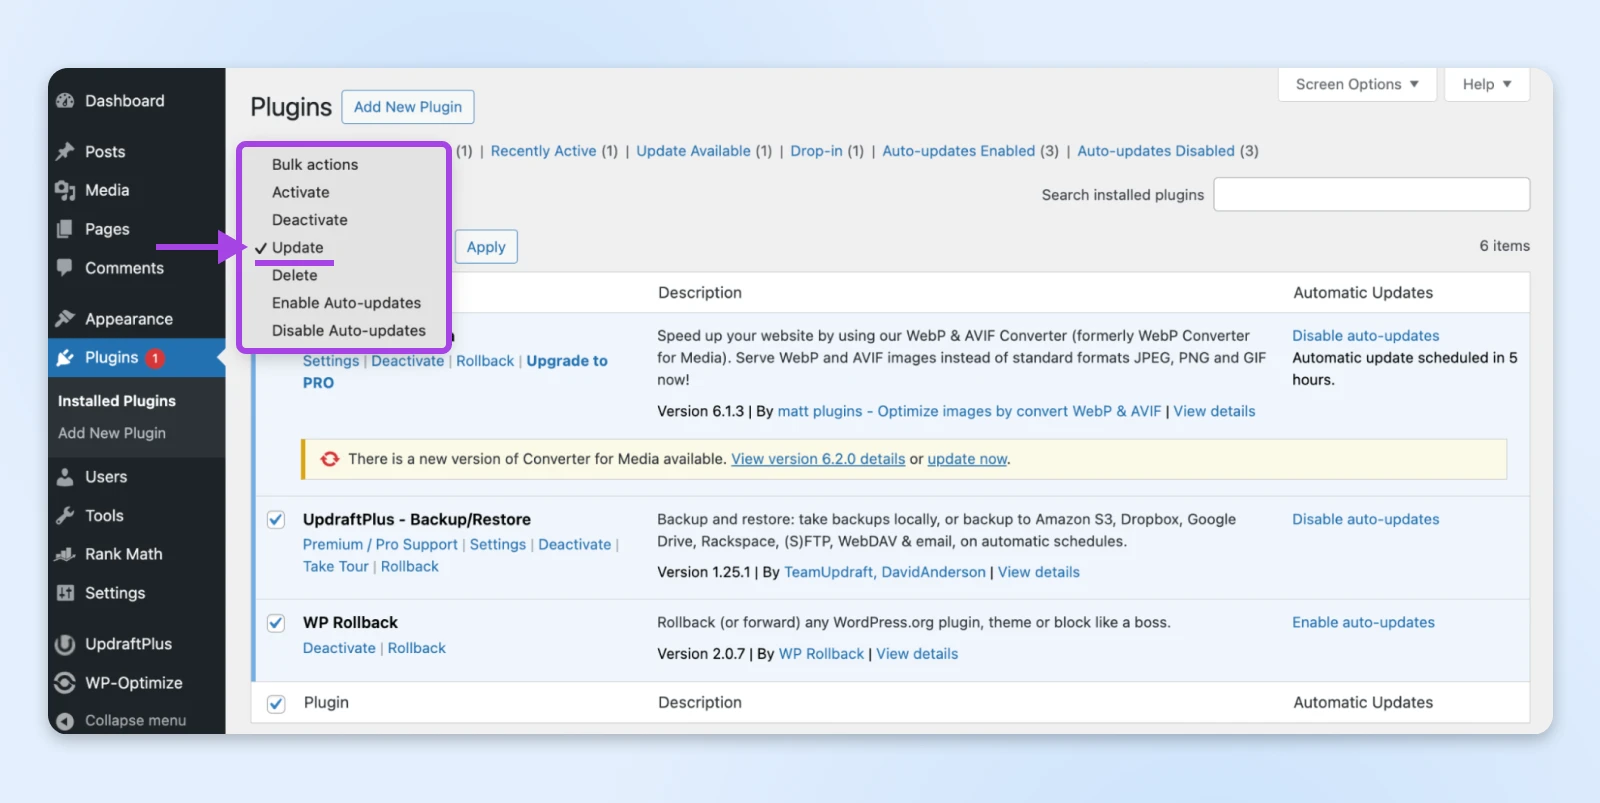
Then click the dropdown that says Bulk actions and select Update. Then click Apply.
Test after each update to ensure the site is still functioning properly.
If an update breaks something, roll back using WP Rollback or restore from a backup.
6. Update Themes
Navigate to Appearance > Themes and check for available updates.
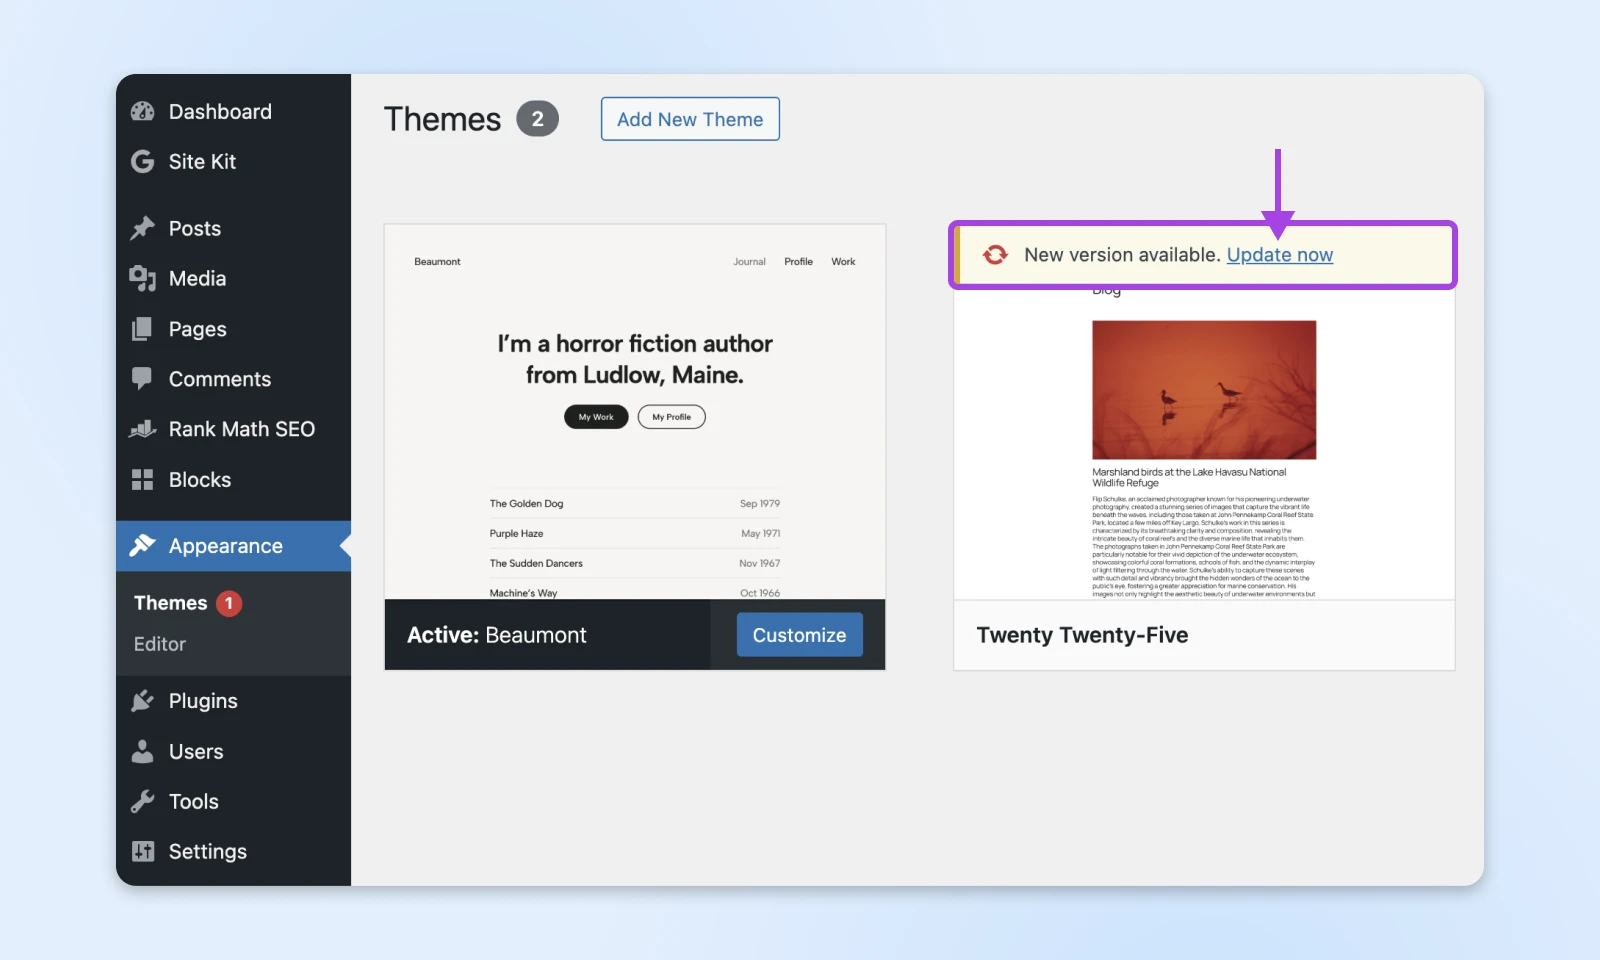
If you’ve customized your theme, make sure you’re using a child theme before updating. The themes that have an update available will say and you can click the Update now button to complete the update.
After updating, check for any broken layouts or missing styling and if needed, restore your backup or manually reapply customizations.
7. Update WordPress Core
There are three common ways to update WordPress:
- One-click WordPress update via dashboard: Simply click the “Update now” button and WordPress takes care of everything behind the scenes. You still need to follow the precautionary steps outlined in this article, though.
- Manual update via FTP: Download the latest version from WordPress.org, upload via FTP, and replace core files while excluding “wp-content” to preserve themes and plugins.
- WP-CLI update: For advanced users, run “wp-core update” via the command line.
We’d suggest going the one-click update route. Before updating, disable caching plugins to prevent conflicts:
Go to Dashboard > Updates and then click Update to version <version number>.
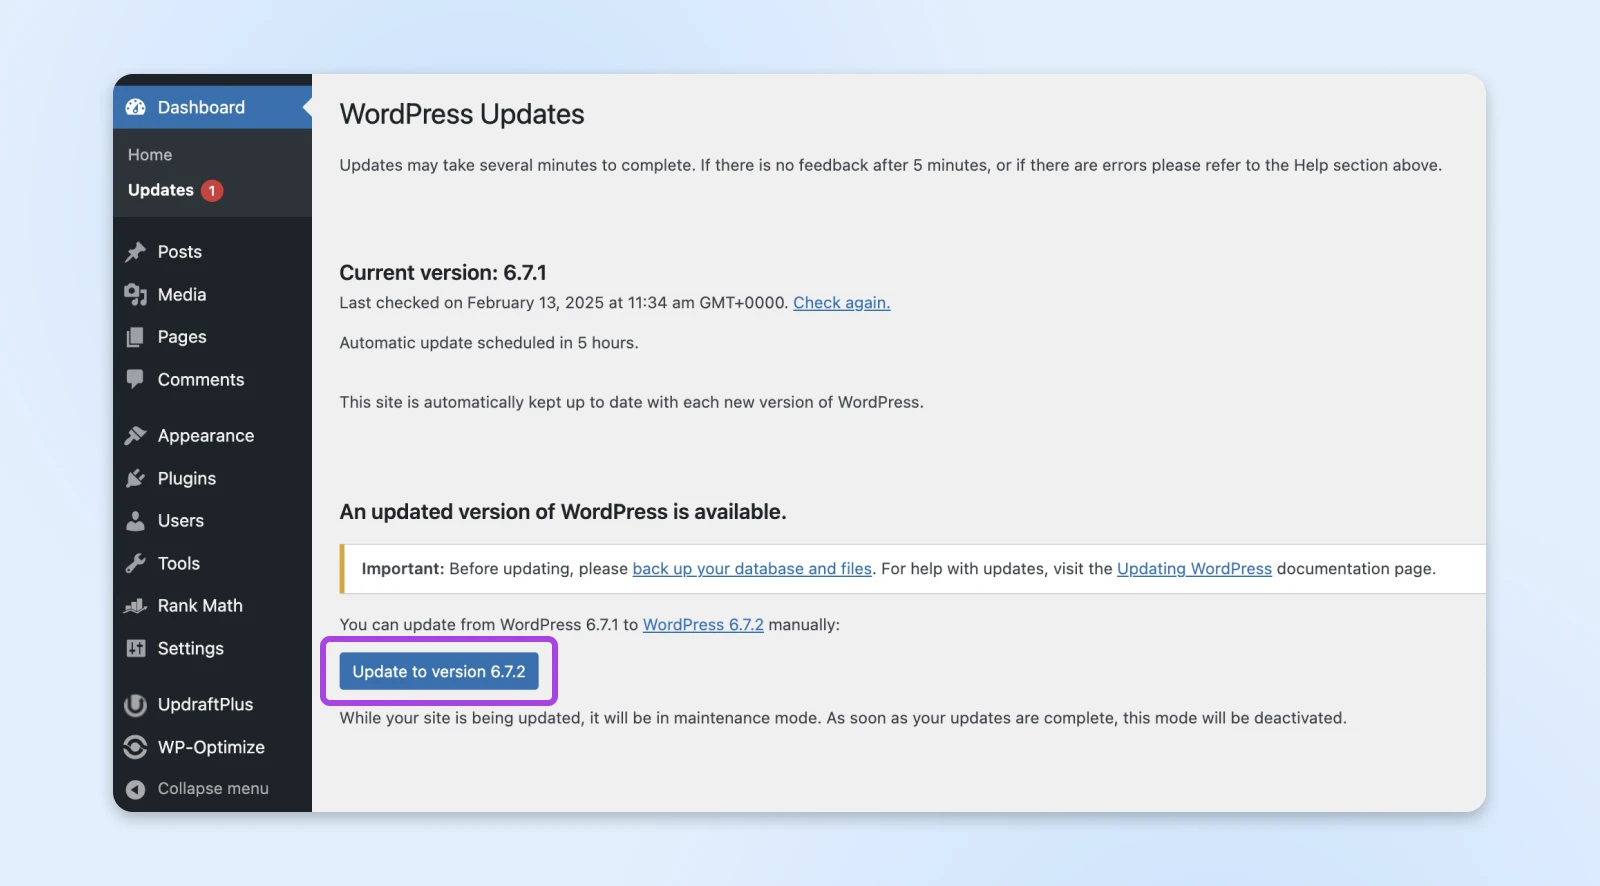
Click Update Now in the WordPress dashboard when ready.

Keep an eye out on your site throughout the update process. If it gets stuck, refresh the dashboard or check for file permission issues or any other errors that may show up.
Post Updating WordPress Core, Plugins, and Themes
Your updates are complete, but your work isn’t over yet. Before assuming everything is running smoothly, you need to take a few final steps to ensure site stability, performance, and security.
1. Clear Cache
Caching speeds up your website by serving stored versions of pages instead of dynamically loading everything.
However, after updates, outdated cache files can cause display issues, broken layouts, or old scripts conflicting with new code.
To prevent this, clear caches at multiple levels:
- WordPress cache: If you use caching plugins like WP Rocket or W3 Total Cache, purge all caches from their settings.
- Server cache: Some hosting providers (like DreamHost) have built-in server-side caching that helps you speed up your website. After updates, make sure you clear server-side cache as well.
- CDN cache: If you use a Content Delivery Network (CDN) like Cloudflare, log in and purge the cached files to ensure visitors see the latest version of your site.
- Browser cache: Encourage visitors and team members to hard refresh (Ctrl + Shift + R or Cmd + Shift + R) to load fresh content.
Once caching is cleared, reload your site and verify that updated styles, scripts, and functionalities appear as expected.
2. Check for Broken Functionality
Even though you tested everything on staging, you need to redo the thorough checks on your live websites. Make sure that the most important functions are working as expected.
These can include:
- Contact forms
- E-commerce checkout flows
- Custom scripts
- User logins
Once you know these are working fine, you can continue your testing for the rest of the non-critical functions and pages of your site. After this, you can start re-enabling your caching and security plugins one by one, so if the website breaks, you know what plugin caused the conflicts.
3. Monitor Your Site for Errors
The real test begins after updates go live. Even if everything seems fine initially, errors can appear later, affecting user experience, site speed, or search rankings.
To catch issues early:
- Use Google Search Console to check for crawl errors, broken links, or indexing issues.
- Set up New Relic or Query Monitor to track slow queries, PHP errors, and server response times.
- You can also use UptimeRobot to get alerts if your site goes down after an update.
- Ask real users to report issues, because automated tests don’t always catch everything.
If you spot a problem, check the error logs and roll back the problematic update using your backup.
Something’s Wrong? Troubleshooting Common WordPress Update Errors
Even with precautions, things can still break. Here’s how to fix the most common update issues:
White Screen of Death
Your site loads a blank white screen, with no error message. This usually happens due to a PHP conflict from a plugin, theme, or memory issue.
- Deactivate plugins: Access your site via FTP. Go to “/wp-content/plugins/” and rename the folder to deactivate all plugins. If the site returns, rename it and enable plugins one by one to find the culprit.
- Switch to a default theme: Rename your theme folder in “/wp-content/themes/” to force WordPress to use a default theme like “Twenty Twenty-Four.”
- Increase memory limit: Edit “wp-config.php” and add “
define('WP_MEMORY_LIMIT', '256M');”
wp-config.php?
wp-config.php is a file in the WordPress root directory that contains your website’s configuration details. These include your database name, host, username, and password.
Stuck in Maintenance Mode
If your site shows “Briefly unavailable for scheduled maintenance,” WordPress didn’t complete the update.
You can use FTP to delete the “.maintenance file” in your site’s root directory, and your site should be back almost instantly.
Plugin or Theme Conflicts
After an update, some parts of your site stop working — this usually means a plugin or theme isn’t compatible with the new version.
- Rollback to a previous version: If you suspect a plugin, use the WP Rollback plugin to revert to an older version.
- Check for updates: Some developers release patches quickly. Updating again may fix the issue.
- Find an alternative: If a plugin isn’t being maintained, consider switching to a more reliable option.
Database Connection Errors
Your site shows “Error establishing a database connection,” meaning WordPress can’t communicate with the database.
- Check “wp-config.php”: Verify that your database name, username, password, and host are correct.
- Repair the database: Add “
define('WP_ALLOW_REPAIR', true);” to “wp-config.php” then visit “yoursite.com/wp-admin/maint/repair.php” and run a repair.
When To Call In the Experts
If you’ve tried troubleshooting but your site is still down, or if you’re not comfortable making these fixes yourself, it’s time to bring in professional help.
WordPress is one of the most popular content management systems. That means, if you get stuck, there will be someone on the internet who can help you fix it. But that still requires that you take precautionary steps before you make an update.
Best Practices To Prevent Breakage
- Use a child theme: Customizing parent themes directly makes updates risky. Always use a child theme to retain modifications and prevent overwrites.
- Limit plugin use: More plugins mean more potential conflicts. Stick to well-maintained, widely used plugins with frequent updates and active support.
- Delay major updates: Newly released WordPress versions may have undiscovered bugs. Consider waiting a few days so developers can release patches for any early issues.
- Choose a quality hosting provider: Managed WordPress hosts offer automatic backups, staging environments, and expert support during updates, reducing risk and downtime.
- Enable automatic backups: Even if your hosting provider offers daily backups, having an additional backup strategy ensures redundancy in case of failures.
Stay Updated Without the Hassle
WordPress updates don’t have to be stressful.
With the right approach, you can ensure security, stability, and performance without risking downtime. But if you’d rather skip the technical headaches, a managed WordPress hosting solution is an easier choice.
DreamPress by DreamHost takes care of WordPress updates, backups, and performance optimizations, so you can focus on growing your site instead of troubleshooting updates.
With built-in staging, automatic backups, and expert support, DreamPress ensures your site remains secure and fast — without the risk of breaking during updates.
WordPress updates are essential, but you don’t have to handle them alone.

Protect Your Website with DreamHost
Our automatic updates and strong security defenses take server management off your hands so you can focus on your customers.
Did you enjoy this article?